Hexagon Measurement SystemsNo matter what Hexagon measurement equipment or software you use, we want to hear your ideas and suggestions on how we can improve.
Thanks for your assistance in helping us shape the future. |
|

 关于替换元素名称
在2018版本甚至以前的版本 替换元素名称可以在概要模式下进行,并且替换名称之后测量误差还在。更新2022和2023以后替换元素名称不能在概要模式下进行了,即便更换为命令模式替换元素名称之后 误差值不在了。

 Work with Sample Hits
As a programmer, I would appreciate the ability to work with Sample Hits from Auto Features in the new versions.
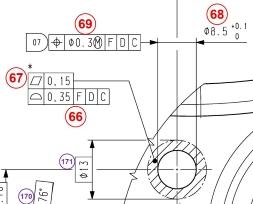
In the picture is an example of usage.

I need to use at least three Sample Hits to measure the hole precisely.
Then I have to measure the contact surface around the hole, e.g. as an Auto Feature "Auto Plane" using "Relative to" to this hole.
If there was a possibility to use Sample Hits in the construction, I would measure the hole with using more Sample Hits which I would then use to construct the contact area around the hole and I would save one feature measurement in the program, which itself is not much, but if you have e.g. ten such holes on the part, it already saves some time spent on the 3D machine, which is very welcome in serial production.

 Simultaneous Tolerance command - Filter list on truly different datum features, not just the name.
When entering a new simultaneous tolerance command, there is a "smart" filter in which dimensions that don't share the same datum reference frame as the first selected dimension will be removed from the list. The filtering seems to be based on the datum letter(s) itself and not the actual datum features used within the DATDEF command.
Example: A part is measured, flipped halfway through, and measurement is finished. In both orientations, the same datum feature was measured (measured twice). When creating dimensions, DATDEF commands are inserted at the appropriate location, redefining the datum required for measurement (datum feature pre-flip, datum feature post-flip). The Simultaneous Tolerance command will show all of the dimensions in the dialog window after auto-filtering, but selecting all the dimensions will result in an error "Simultaneous tolerances must have identical datum reference frames." because the datum features are technically different in each dimension (pre-flip vs post-flip).
Please investigate the feasibility of changing the filtering rules of the Simultaneous Tolerance command by looking at the actual features used in the DATDEF command, and not just the letter(s) assigned.
Thank you.

 Fix exporting generic file(from 20202, aka geometric tolerance) so that all dimensions are exported, just like it was in XactMeasure. Thanks you

 Have PC-DMIS save mid program automatically
When running larger programs in PC-DMIS on my computer, if I have any kind of error the software usually freezes then closes on me. Would it be possible to have the software save periodically in the background while its running. Right now I stop the program 3-5 times to save it so if it crashes I dont have to start from the beginning.

 Add cylindrical line profile tolerance evaluation (for pipes/tubes)
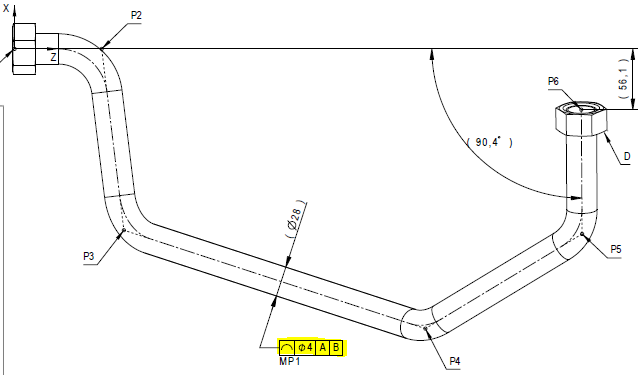
I would love to have the possibility to evaluate cylindrical line profile tolerances, especially used on tubes/pipes.
Example:

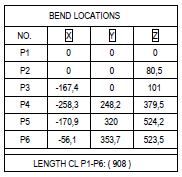
Often (but not always) used with a coordinate table:

...and a bending radii:

With this information, we can create a pipe centerline (if we don't have CAD) to use as nominal.
I have already checked the other Hexagon software offerings, such as BendingStudio and TubeShaper and they cannot evaluate this. The application manager for BS even told me that BS cannot and will not be able to evaluate this. BS is for manufacturing - not metrology.
AFAIK, no software on the market can evaluate this, except for PC-DMIS and Metrolog - with the help of an external program made by Hexagon Metrology Nordic called JoTube2. However, this program is no longer under active maintenance and hasn't been updated since 2013, probably due to low sales (and the author retired). This means that we need to find a solution to this problem as the software is slowly decaying due to OS upgrades and soon we won't have the luxury of being able to use it.
The two largest truck companies in Sweden are using this line profile tolerance for their pipes, I am unsure of other manufacturers. This means that the suppliers to them are suffering from the same problem - no proper evaluation method...
Line profile is mainly 2D, but ISO 1101 points to ISO 1660 that states that line profile tolerance zone can be made cylindrical by preceding the tolerance value with Ø.
Please consider to include this to PC-DMIS, either as an option or a standard feature!

 Summary and command mode taskbar button
Addition of a taskbar button to switch between summary and command mode easily

 Separate scanning parameters from probing parameters
When changes are made to scan parameters such as point density
all other probe parameters are also automatically entered in the program.
However, if parts are measured with different measuring machines but the same program, the stored probe parameters must not be changed.
As this is not possible, the probe parameters must be adjusted each time in the program.
Scanning parameters should therefore be separated from the probe parameters, as is the case in other areas.

 Visual indicator for scan control points
When trying to add control points it is very difficult to understand what the control point is actually doing or when it will trigger. If there could be some sort of visual aid that shows the control point along the scan path that would be very helpful.
Customer support service by UserEcho


