Hexagon Measurement SystemsNo matter what Hexagon measurement equipment or software you use, we want to hear your ideas and suggestions on how we can improve.
Thanks for your assistance in helping us shape the future. |
|

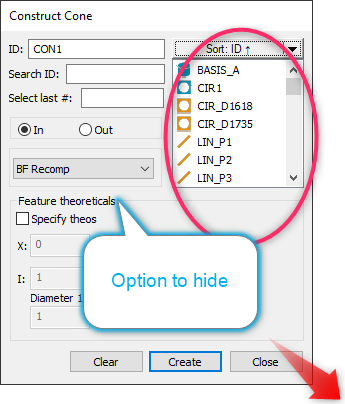
 window improvement ( size, hide etc)
Hi,
It would be great if improve the windows.
-Feature theoretical area maybe changeable hide /extend.
Feature list long (in red circle) sometimes would be great if extend by modify the full size of windows bottom-right corner pulling...


 Probe the intersection point between two straights with a small angle
I would like that existed an option to be able to probe manually the intersection point between two straights that form a small angle (5 degrees, for example).
This option was implemented in Docs or GTube.

 PCDLRN.exe closing (Exit) improvement.
PCDLRN.exe closing issue is one of PC-DMIS most coming issue that never been completely solved. PC-DMIS is the only software that I have ever used that needed the Task manager to end the software at this level. How many years will it take Hexagon to completely fix this issue. If you use PC-DMIS, you will sooner than later get to know the Task Manager very well.

 Intervention limit for certain characteristics instead of general evaluation
Hello everybody,
We are looking for a way to define a Limit of Intervention for our workers for certain characteristics.
The Background to his is that it does not help us to tighten the Intervention Limits for the complete Evaluation because in punching Technology we deliberately always run holes on the largest possible Diameter and then These must not be marked accordingly.
Hallo zusammen,
wir sind auf der Suche nach einer Möglichkeit, dass wir für unsere Werker für bestimmte Merkmale individuelle Eingriffsgrenzen festlegen können. Hintergrund ist, dass es uns nicht hilft, wenn wir die Eingriffsgrenze für die komplette Auswertung anziehen da wir in der Stanztechnik beispielsweise Löcher bewusst immer auf dem größten möglichen Durchmesser produzieren und diese dann aber nicht entsprechend als Eingriffsgrenzen Verletzung gekennzeichnet werden dürfen.
Ziel: Eingriffsgrenze für einzelne Merkmale anstatt komplettes Protokoll.

 Excel form: Export Bonus value from the material condition calculation
In the new Excel form, if i export a FCF dimension that uses Material condition, I have no information about the bonus value that was used, but only the nominal/tolerance values.
If my Excel form uses a formula to calculate deviations or other values in excel i will get a wrong calculation.

 I would like to be able to import measured values from external files
In TubeShaper we can export nominal or measured values, as CAD or as Supravision/Centerline files.
I would like to be able to import the measured values (as iges/supravision/etc... the best format you can find:) ) in order to have the opportunity of an off-line evaluation.
This can be used even in the condition that the measured files were generated from other software.

 Window Menu shortcuts
I, like others, use shortcut keys to save time while using PC-DMIS and other programs. When I have multiple programs open in PC-DMIS I would greatly prefer to be able to edit them side by side, but that is not possible currently. When I open the Window menu with Alt+W to switch from one program to the next, the current open program has a shortcut key of 1 and the second has a shortcut of 2. This is fine, except the report window and graphic display window also have shortcuts of 1 and 2 (see attached image, filenames have been cut out). My suggestion is simple. Change the Graphic Display Window shortcut to G, the Report window to R, etc.


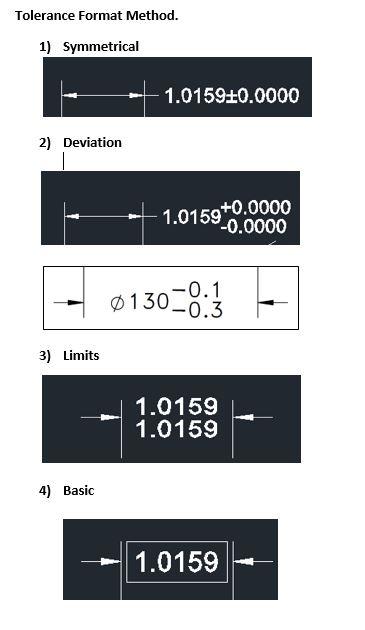
 Tolerance Format Method
In PC-DIMS Tolerance Format Method need to be update in dimensional callout tool , since every time we need play with Plus/minus tolerance Method to below Tolerance Format Method.


 Option to load CAD file based on user input
Add the ability for users to code in an import CAD file based on variables. IE:
What part are you running? -2
if c1.input == "-2"
import, igs, "c:\models\ 123-2.igs"
end_if
something to that effect, for when there are a family of parts with minor changes in the part and you want to write a single program to run all parts in the family, but want the correct CAD file to show, as to not confuse the operator when the incorrect part is showing on the screen.

 Allow to default feature colors within "Edit Feature Appearance".
Having the ability to have custom colors default for feature colors makes changing the background color cater the color choices. Creating multiple features then having to back track and open the "Edit Feature Appearance" to change the color is not ideal.
Customer support service by UserEcho


