Hexagon Measurement SystemsNo matter what Hexagon measurement equipment or software you use, we want to hear your ideas and suggestions on how we can improve.
Thanks for your assistance in helping us shape the future. |
|

 best way to report +/- material on individual points on a constructed circle
best way to report +/- material on individual points on a constructed circle

 Allow move points in only 1 or 2 axis in Summary Mode
While programming in Command mode, If you inserted a move command:
MOVE/POINT,NORMAL,<0,0,5>
Then delete the axis that you don’t want to move
MOVE/POINT,NORMAL,<,,5> (This will move only the Z axis to 5 above the current alignment.)
Once we write a program, our shop floor uses protect mode on the CMMs to keep the programs from being messed with. Protect mode automatically enables summary mode.
According to the PCDMIS help file, when summary mode is turned on, PCDMIS will override this setting and move the XY coordinate as well.
|Pasted below from the Help File. Link is also below. Paragraph is at the bottom of the article|
Moving In Only 1 or 2 Axes
In the Edit window in Command mode, you can set one of the axis values to blank (which means that you completely delete the value) to give the axis a relative move of zero during measurement routine execution. This essentially lets you have a hybrid relative and absolute move point behavior using the MOVE/POINT command.
This feature only works fully in Command mode. If you use Summary mode to do this, the field disappears from the Edit window. If you want to then set it back to a number value, you need to set it in Command mode.
As an alternative to this post, could we have a Command mode view, yet still keep protect mode on? Whichever would be easier in my opinion.

 Quickly turn on and off pathlines?
Could a shortcut key be created or a quick button to turn on and off pathlines in a program?

 some terminology mistakes in Chinese version
In the Chinese version, the following terminologies do not match the Chinese national standard:
| English terminologies Feature Plus Tolerence Minus Tolerance | Terminologies in Chinese PC-DMIS 特征 上公差 下公差 | Terminologies in GB 要素 上极限偏差 下极限偏差 |

 How can i stop nexus metrology reporting every single time when one feature execute? any solution?

 PCDMIS admin panel
Hello PCDMIS gurus and devs.
I would appreciate if PCDMIS had admin panel where I could define all settings once and then point this admin panel to every computer where installation of PCDMIS exists this way If I wanted to change say for example speed of all machines or some other generic settings it would be done from one panel. For example layout of buttons, speed of 3D CMM, loading colors for highlighting code etc.

 Adding comment to assign command
You should be able to add a comment to the end of an assign line of code.
For example, currently the code is
ASSIGN/V1=10
it would be good if you could add a comment at the end to help with editing the program by adding $$ at the end, example
ASSIGN/V1=10 $$ diameter of hole 1
ASSIGN/V2=20 $$ diameter of hole 2

 Implement support of a compound datum made of two non coaxial circles.
Example A is a plane, B and C are two circles laying in plane A. I need to evaluate GD&T relative to A|B-C. B-C should be treated a as pattern. ref case #00757938
Note: B and C are measured on a thin glass lens with a Vision probe on an Optiv Reference machine: they are 2D and cannot be measured as cylinders.
This functionality is supported in other metrology software. This is very frustrating and embarrassing for my customers.

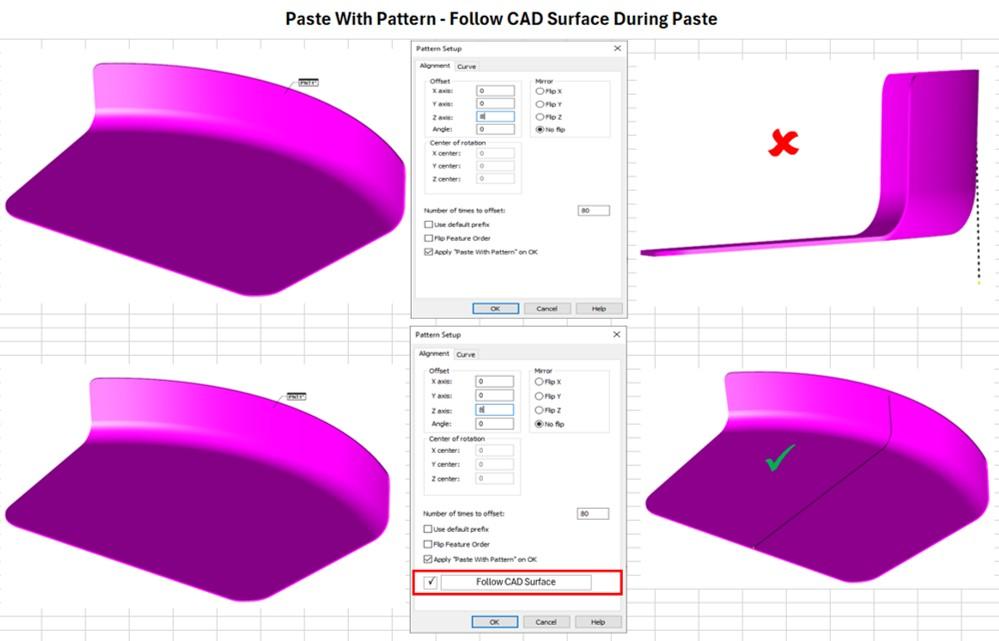
 Paste with Pattern - Follow CAD Surface During Paste
I would like the paste with pattern function to have the ability to follow the CAD nominals surface as it pastes. Currently paste with pattern only applies the pattern offsets to the copied point and does not necessarily follow CAD. This works fine for flat surfaces but does not work for any surface with shape. I understand that paste with pattern "Curve" follows CAD but only the edge curve. Paste with pattern that would follow the CAD surface would allow users to fill any surface with surface points by only programming one surface point. This would be a huge time saver and give the user the ability to put multiple points anywhere on the CAD surface quickly. With PC-DMIS portable the COP contains millions of points but it is time consuming if you wanted to add rows of surface points on surface with shape. This would be a good feature for Portable or CMM.

Service d'assistance aux clients par UserEcho


